Sunday, January 30, 2011

The Path to Sourdough Recipe

I have been on a journey for what I consider to be the true, traditional Sourdough bread... Actually, it is the sourdough that my cousin's best friend's mom Cindy used to make (seriously!). It was so good, and definitely not a "San Francisco Sourdough." It was light, soft, and a bit sweet and rich, and of course tangy. I can't remember if she kept the recipe as a family secret or not, but I haven't seen any of her family in probably a decade or more. Occasionally I run across local bakers at Farmer's Markets or some such that make the same bread. I'm beginning to suspect that it is actually bread made from the Sweet Herman variant... and soon I will be able to test this theory since my friend Heather gave me some Sweet Herman starter from her family! :^D

But this loaf is easily my best Sourdough experiment yet! This came out dense and a little moist, with a lightly crunchy crust. Most of its rise seemed to happen in the oven, and mine didn't rise all that much even then. The top layer flaked up and partly separated (I kind of liked it!). It has just the right amount of sourdough tang to my taste. It is not the sweet, soft bread I have been seeking, but it is a wonderful bread to enjoy for its own sake. Its mellow tang works equally well with sweet or savory foods and it's good enough to eat straight.

And it is quite delicious in my awesome chicken soup from last night. ;^D


Basic Sourdough Bread Recipe
(No kneading necessary)

On the night before baking, combine and mix:
  • 135g Sourdough Starter straight from the fridge
  • 135g Water
  • 135g Bread Flour (Use about a third or ~45g Wheat Flour in this for flavor & texture)
Cover and let rise ~12 hours (overnight).


Next morning, add the following ingredients and mix thoroughly:

  • 1.5 tbsp Sugar
  • 1.5 tbsp Salted Butter
  • 3/4 cup Milk
  • (Bread Flour and Olive Oil - See below)

Then add just enough bread flour to make a sticky dough (or add enough flour to handle and knead as you normally would, if you prefer).

Cover and let rise 3 hours. My dough didn't look all that excited, but it smelled right. Grease a bread pan thoroughly with olive oil. Throw your dough into the pan and roll it a little to make sure it's coated.

Cover and let rise 3 hours again. My dough actually looked flatter when I came back to it...

Bake at 350F for 35-40 minutes or until pale brown and crusty. Turn out onto a rack to cool and enjoy! I burned my fingers a little bit while enjoying mine. ;^)

Saturday, January 29, 2011

Awesome Chicken Soup Recipe

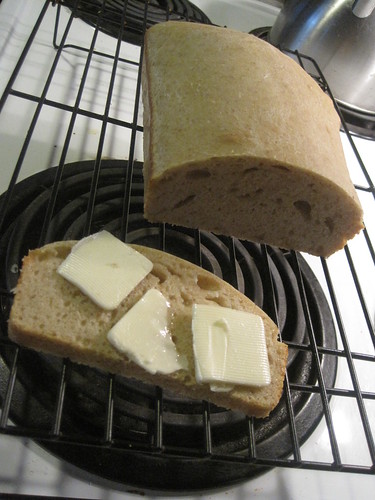
How awesome is it? It's way awesome. Also, Harris Teeter's rosemary-olive oil bread is awesome...


Anyway, the really awesome thing is that I was able to sneak the whey from my frozen yogurt into it, and even our slightly sub-standard cream cheese. (I think the cream cheese will be better when we get the right culture for it - apparently fil mjolk is not the ideal choice).

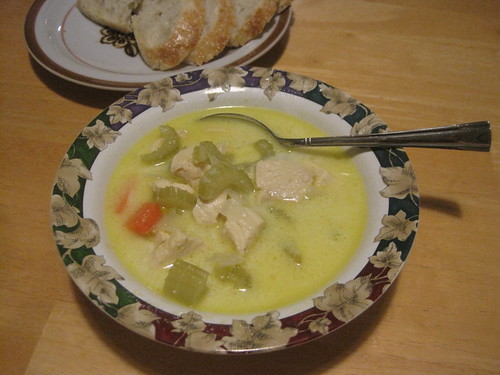
The whey really brought the flavor, and man did the cream cheese elevate an already tasty broth! A subtle addition of ginger and curry round out the broth seasonings without being completely in-your-face. :^)

Try it and see for yourself!

Awesome Chicken Soup
  • Salt & Pepper
  • Olive Oil
  • Onion (half, chopped)
  • Celery (up to a cup, chopped)
  • 2 Carrots (chopped)
  • Chicken (up to 1/2 pound small cubes) optional
  • 4 cups Whey and/or Water
  • 3 Chicken Bouillon Cubes (I used Reduced Sodium)
  • Bay Leaf
  • 2-3 generous dashes Ginger Powder
  • 2-3 generous dashes Curry Powder
  • 2-3 handfuls of Brown Rice, Lentils, Barley, etc.
  • 1/2 to 1 cup of that less-than-perfect Cream Cheese you tried to make.... Substitute Drained Yogurt or Cream Cheese
Start by pouring in just enough olive oil to almost coat the bottom of your big pot. Liberally sprinkle with salt and pepper, and heat to medium or medium-high. Throw in the chopped onions. Saute briefly, or until translucent if desired. Add celery, carrots, and chicken.

Pour in your whey and bring the total volume up to 4 cups with water. Add the 3 Chicken Bouillon Cubes and increase the heat to high to get things going. Throw in the Bay leaf and add Ginger and Curry to taste. Cover with the lid.

After the water is boiling add your grains/beans. I like to throw in a couple handfuls of red lentils and brown rice. Reduce heat to a simmer and keep covered. Cook 40 minutes to an hour (or longer if you prefer). Taste test periodically for your preference on mushiness/tenderness.

Once the soup is properly done add the cream cheese that didn't quite make the grade for bagels. ;^) Add by heavy spoonfuls and mix in thoroughly until it reaches the proper richness. Add salt and pepper to taste.

Vegetarian Notes: This would be fairly easy to convert to a fully vegetarian recipe. Omit the chicken of course, and substitute a seasoned vegetable soup stock based on mushrooms. If you're making your own I suggest using a combination of dried mushrooms that includes Shitake (because they're awesome).


Were you wondering if I had made the lemon curd frozen yogurt experiment?


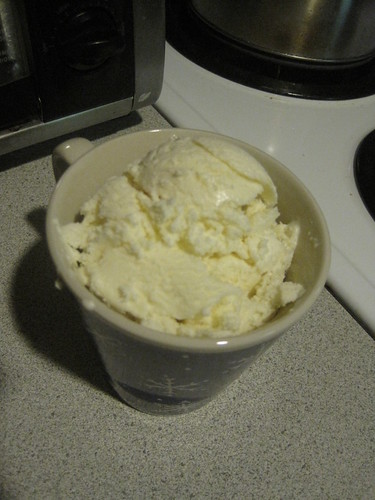
Oh yes. I didn't even feel bad that I had to finish off all of the chocolate frozen yogurt in the freezer to make room. Sebastian didn't complain at helping me either, hehe.

And how was it? Delicious, but I think it will be even better the next time I make it. (Because I won't try to get pudding consistency in the pot while making the lemon curd! My lemon curd has very faint egg undertones that I expect were caused by me taking the temp a little too hot and too long. Despite this it is still fantastic).


Lemon Curd Frozen Yogurt
  • 3 cups Drained Yogurt (I used half Viili and half Fil Mjolk)
  • 3/4 cup to 1 cup Lemon Curd (fully chilled)
Combine ingredients (use the full cup of Lemon Curd if you want it be really lemony). Freeze in your ice cream maker and enjoy! I know I'm enjoying mine. :^D


If you like to sauce up your frozen treats milkshake style, I highly suggest using half-&-half for homemade frozen yogurt. I tried just using milk with my chocolate frozen yogurt and it really fell flat for me.

Friday, January 28, 2011

Single Serve Yogurts

Thanks to the local Target's extensive selection of plasticware, I was able to find me some neat little 4-oz containers. So yeah, I now have the power to make my own single-serve yogurts. :^)

I made a few sugar-and-spice with Viili yogurt the other day, but after making the lemon curd I knew I had to try out some fruit-on-the-bottom. Okay, some fruit curd-on-the-bottom.


Cute, aren't they? Wait... what's that there?


Lemon Curd! Get me a spoon! ;^)


Also, for your viewing pleasure... What happens when a 5-yr-old has unrestricted access to your house until about 10:00am (and you've already taken away his laptop and TV privileges)?


You get pictures taken through the barrel of a packing tape dispenser. Also, you get pictures of fingers, computer, the random toy that happened to be on the desk, and the cat. I'm honestly surprised there was only one "photo shoot" during his track-out.

Thursday, January 27, 2011

Lemon Curd

I ran across a reference to lemon curd when I was looking up information on yogurt, and flavors. Apparently it's hard to get a proper lemon flavor in yogurt, but using lemon curd really helps with that. And... it sounded like everyone loves this stuff. I'm a fan of apple butter and pear butter (although I haven't tried making them yet). So I gave the lemon curd a try.

I used the recipe from Barefoot Contessa. I omitted the salt and used salted butter instead.


In case you were wondering how it tastes, this is a picture of the pot I used to make it:


It tastes awesome. It's this delicious tangy sour-sweet-rich-custard yumminess, and I can guarantee you that it will be involved in my next frozen yogurt experiment. I just have to finish off the chocolate frozen yogurt first. And it is quite fantastic in un-frozen yogurt. Much better than any lemon or lemon pie flavored yogurt from the store!

It wasn't as hard as I thought it might be. I've made puddings before (this didn't thicken as much as they do in the pot - I hope that's normal), and zesting the lemons turned out to be easiest with a cheese grater. I used the actual grating side.

Also, I'm going to attempt to boil my naked lemon halves and see if I can get something lemony for cleaning solution. Lemon juice and lemon oil are supposed to be quite good at cleaning, and even decent at bleaching. I guess that's why so many cleaning products are lemon-scented.

Wednesday, January 26, 2011

Trying To Go a Little Greener

I have confession to make. I'm a late-evening ice cream snacker. (And not just some nights. I look forward to getting the boy to bed because I know it's not much longer before I hit the freezer). It's more ritualistic than coffee and I love it. The problem is... no, not what you think. The problem is that I'm also an ice cream snob and this means my habit is a little pricey. Money is super tight right now and it's hard to justify my carton-a-week Breyer's habit.

But there actually is something I love just as much if not more than ice cream. Frozen yogurt (mmm, droooool....). Which is as expensive or more than ice cream, assuming you can find it at all in the grocery. And then it has weird crap in it like guar gum to try to imitate ice cream, but all that does is give it a super annoying texture that makes you annoyed when you're trying to scoop it. So...

My friend recently discovered mesophilic yogurts - yogurts that culture at room temp and don't require any special equipment or close monitoring. Matsoni, Piima, Viili, and Fil Mjolk. She gave me some, and I've been having fun with them. I like them best when I've drained them. It makes them thicker and richer. But best of all, I like to make frozen yogurt with them. And making it from scratch with yogurt that I made from scratch makes me feel empowered! I don't know if I'm really saving any money, but I know exactly what's in it, and exactly how long it's been in the freezer.

But what's the green? I guess in my mind self-sufficiency walks hand in hand with "going green." My same friend also loaned me a book that has helped me realize that I've been on the brink, but hadn't quite taken the plunge toward green. I took inspiration and started making my own cleaning spray since I had everything on hand already (basically just vinegar-water and tea tree essential oil). I bought a set of 10 cloths to try using less paper towels. Seriously, what did people do before paper towels? My dependence is becoming an embarrassment! Little bit and little bit, I'm trying to save a little money, eat a little more healthy (or at least a little more interesting, hehe) foods, use more basic and natural food and hygiene ingredients, and overall to waste less.

I know it sounds strange, but I haven't really felt like I needed coffee since I started eating yogurt more. I read somewhere that we develop a dependence on caffeine partly from an insufficiency of specific proteins. Who knows?

I hope I've inspired you a little. I would love to hear your thoughts on food, ways to be a little more earth-friendly, and ways to be less dependent on the system. And maybe I'll even update my blog once in a while.

Next on the list of fun things to try: honey mead! But first I need to find (and afford) some good local honey.